Mikael Blomqvist

Track system Startup, Shutdown, Uptime and much more using Windows logs Event ID’s

The following Event ID’s in the System log are nice to know for various debugging scenarios on the client computers.

1074 – Information about program or user that initiated restart/shutdown

6005 – Startup time

6006 – Shutdown time

6013 – System uptime

Using the “Filter Current Log” feature allows you to search for occurences of the events you want to dig into.

Debugging entry points for package.ini

I recently had to make a thinapp version of an application which among other features had some database integration. To allow connection to the database the installation created two services. After having made a build of my capture and thereby the thinapp i was uncertain wether i actually succeeded at virtualizing the services.

As the virtualized services are only visible from inside the thinapp “bubble” i had to create an entry point to services.msc in my package.ini. This way i could launch services.msc before my thinapp to verify that the services actually were created.

The entry point i added for services.msc looks like this:

[Services (ThinApp).exe]
Disabled=0
Shortcut=<PACKAGE SOURCE FILE>
Source=%SystemSystem%\MMC.EXE
CommandLine=%SystemSystem%\MMC.EXE %SystemSystem%\SERVICES.MSC
Icon=C:\Windows\system32\filemgmt.dll,0


See the Vmware blog for more entry points:

http://blogs.vmware.com/thinapp/2008/10/creating-window.html

Edit Registry on a mounted WIM

This guide assumes that ImageX is avaliable on your computer. (Avaliable via Windows Automated Installation Kit (WAIK).

Mount the WIM file

Mount the WIM file to a local folder using ImageX. C:\ImageX>imagex /mountrw install.wim 1 c:\mount

Load the registry hive

Load the registry hive you need. In this case let’s mount HKLM\Software.

C:\mount reg load HKLM\test c:\mount\windows\system32\config\software

Open Regedit to make changes or use Reg Add from the command line.

Unload the reg hive

C:\Windows\system32 reg unload HKLM\test

Unmount the image

C:\ImageX>imagex /unmount /commit c:\mount

Capture image using ImageX

When doing the capture you should have booted into WinPE. You can place the wim file on a remote file share aswell as locally. To use a remote file share map it as a network drive when booted into WinPE.

imagex /capture c: t:\my-windows-partition.wim “My Windows partition”

The following commandline parameters can be added to the above

/compress [maximum | fast | none] : Specifies the type of compression used for the initial capture operation

/check : Checks the integrity of the .wim file. If not provided, existing checks are removed.

For full documentation see: http://technet.microsoft.com/en-us/library/cc749447(WS.10).aspx

Update WinPE Boot image driver

When adding a driver to WinPE make sure that you choose Windows Vista drivers since WinPE is based on Windows Vista.

Intels WinPE/Windows Vista drivers are found in the PRO1000\Win32\NDIS61 folder after having extracted the drivers from ie. PROWin32.exe downloaded from Intel

For bonus info the extract command on the PROWin32.exe is /f “destination”.

Using a PAC file to restrict access to Websites

If you want to control which websites can be accessed from one or more computers a PAC file solution can be used.

The PAC file is a fairly simple file containing information on which sites can or cant be accessed – depending on what your needs are. This means you can set up a solution where all websites can be accessed except from the ones in your PAC file or you can setup a solution where all websites are blocked except from the ones in the PAC file.

In Internet Explorer you then have to enable the “Use automatic configuration script” under Tools > Internet Options > Connections > LAN Setting and then point to the location of your PAC file. The PAC file can be placed both locally or on a webserver.

Example of a PAC file where only the sites *.google.com, *.facebook.com and *.msn.com can be accessed (Proxy.pac):

function FindProxyForURL(url, host)
 {
// variable strings to return
 var access = "PROXY servername.domain.com:8080";
 var noaccess = "PROXY 127.0.0.1:80";
 if (shExpMatch(host, "*.google.com")) { return access; }
 if (shExpMatch(host, "*.facebook.com")) { return access; }
 if (shExpMatch(host, "*.msn.com")) { return access; }
 // Proxy anything else
 return noaccess;
 }

Example of a PAC file where the above sites are blocked and all other sites can be accessed.

function FindProxyForURL(url, host)
 {
// variable strings to return
 var access = "PROXY servername.domain.com:8080";
 var noaccess = "PROXY 127.0.0.1:80";
 if (shExpMatch(host, "*.google.com")) { return noaccess; }
 if (shExpMatch(host, "*.facebook.com")) { return noaccess; }
 if (shExpMatch(host, "*.msn.com")) { return noaccess; }
 // Proxy anything else
 return access;
 }

 

Windows Time Zone

I made a script to update the Windows Time Zone. In my example i want to use the Romance Standard time which is easily done by specifying this as an argument to the function SetTimeZone

SetTimeZone("Romance Standard Time")

Sub SetTimeZone(timezone)

On Error Resume Next

Set objSh = CreateObject("WScript.Shell")

Dim process, processid, strUpdateCommand
 Set process = GetObject("winmgmts:{impersonationLevel=impersonate}!\\.\root\cimv2:Win32_process")

'Add time change privilege to the process object
 process.Security_.Privileges.AddAsString "SeSystemTimePrivilege",True
 strUpdateCommand = "control.exe timedate.cpl,,/Z" &amp; timezone

'Launch control.exe to refresh time zone information
process.create strUpdateCommand,Null,Null,processid

End Sub

Bootable USB

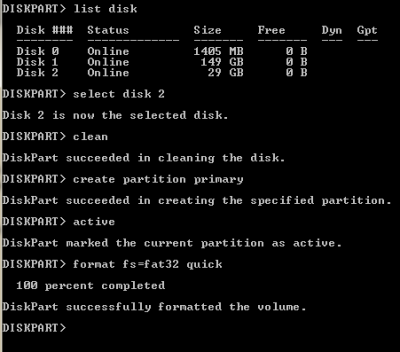
This guide will tell you how to make a bootable USB. To make the bootable USB you need to use DISKPART which comes with Windows. Its important tho that you use either Windows Vista or Windows 7 otherwise DISKPART cant detect your USB key as a drive.

Start your command prompt and type diskpart – this will open a new diskpart window. The rest is shown in the screendump below.